It may surprise you to hear us say this, but often your technique is more important than the product you're using.
What is your go-to styling method? What's your technique like?
If you feel clueless on how to style your curls or need more options because what you're doing isn't working, we've put together this guide detailing every popular method or technique there is for styling your beautiful curls. It will have you rocking snatched and gorgeous curls in no time!
Methods For Styling Curly Hair
Styling curly hair involves a lot of product layering. The order in which you apply those products - and how much water you use at each stage - can make all the difference.
First thing's first:
Wet Styling vs. Damp Styling
There’s plenty of information suggesting that styling your hair when it’s dripping wet is the best way to go, but some people are on the side of damp styling and get better results with less water. The best thing to do is experiment with how much water your hair contains before adding styling products. If you desire more volume, you'll usually get more with damp styling, but for the best clump formation, wet styling is recommended!
We discuss porosity a few times in this post. If you are unfamiliar with how porosity affects product choice, check out our blog post Product Absorption and Low Porosity Hair. As a rule of thumb, damaged or colour-treated hair is high porosity or should be treated as such. Natural, healthy hair is usually medium or low porosity, but it is also common to have multiple porosities on one head.
Now let’s look at a few methods for layering your products:
Leave in, Oil, Cream (LOC)
LOC indicates the order of your product application: what comes first and what should come after. This was coined by Alikay Naturals founder and CEO, Rochelle Graham.
The LOC method includes: Leave-in Conditioner (or "Liquid") → Oil → Cream.
The main goal behind the sequence is to keep that moisture locked in as long as possible!
L: The first layer is water or a water-based leave-in conditioner, such as Mielle Organics Pomegranate and Honey Leave-In.
O: The second layer is an oil that should be selected based on your hair porosity. What's the relationship between oil and your hair? Oils help seal in moisture by forming a thin barrier that prevents moisture from escaping.

For high porosity hair—hair that easily absorbs and loses moisture at the same rate (as quickly as it gains, it loses)—try using heavier oils like castor, olive, or coconut oil. For low porosity hair—with a lower absorption rate and longer moisture retention—you need a lighter oil, so try argan or jojoba or a combination of oils like in the Bounce Curl Light Oil.
Most hair oils available commercially are a mix of multiple oils and other ingredients. You can use a pure oil - you might even have one in your kitchen cupboard - or try something like Righteous Roots Rx which contains castor, olive, and coconut oil.
C: To top it all off, use a cream to add an extra dose of moisture, provide definition and hold to your curls. Your choice of cream should again depend on your hair porosity. For high porosity, butter-based creams would be the perfect choice. Check out Mielle Organics Pomegranate and Honey Twisting Soufflé, Curl Cream by Boucleme and the Rizos Curl Defining Cream!
For low-porosity or fine hair, lightweight and water-based creams should be a go-to, like the Camille Rose Naturals Curl Love Moisture Milk.
You can also switch up the order to LCO. This works better for tight, low-porosity curls or loose, high-porosity curls.
Smasters
This feels more like a combination of method and technique, but one that would be invaluable to your routine if you give it a shot. So, for this, you follow your routine as usual - do whatever it is that you do - and let your hair get to about 50 percent dry.
You have to get the drying time right so that there is still water in your hair but it is not soaking. Then add a gel, mousse, or cream to your hands along with a lot of water to thin out the product. Apply this mixture to your hair using the praying hands or glazing technique (more on this below). This can be the same styling product you applied when your hair was damp, or a different one.
This method is designed to reverse any apparent frizz formation as your hair dries. It’s perfect for you if you notice that your hair tends to get frizzier as the water evaporates.
Smasters is also a great product application method for long-lasting hold. If your gel is more of a medium-hold and you want a harder cast or longer-lasting results, try applying the same gel twice: once on soaking wet hair, and another thin layer when your hair is partially dry.

10 Styling Techniques for Curly Hair
Here are a few common and not-so-common techniques for styling your curls!
1. Squish to Condish
S2C is a mixture of water (lots of it) and conditioner to get that hydration into the curls. This is a foundation for great clumps!
Here’s how it works: while in the shower and after applying your rinse-out conditioner, bend forward so that your hair is off your scalp. Then, scoop a handful of water into your hair.
With the addition of water, your hair should take on a slimy, seaweed-like texture. If that’s what you see, go ahead and squeeze or squish it with your hands until it makes a squelching sound.
You want to make sure you are not squeezing too hard but just right. Picture your hair as a sponge: when you squish in water and conditioner, you're helping it absorb and soak in all of the moisture and nutrients. If you press too hard, you'll end up squeezing the moisture out. If there’s no squelching sound while squishing, you might need to add more water or conditioner.
The "squish to condish" allows for deeper hydration as it combines two sources—conditioner and water. The water helps the conditioning properties seep into your hair, while the conditioner enables the water to penetrate more and lock in moisture. This process should feel heavenly for your thirsty curls, resulting in hydrated and well-defined curls!
2. Scrunching
You’ve probably heard about scrunching or scrunching out the cast (SOTC). This is possibly the most basic styling method.
To scrunch your hair, disperse enough styling products in your hands to cover the section of hair you’ll be styling.
Then, cup your curls in both hands and give them a little squeeze upwards towards your head. When scrunching you'll want to hear that "wet socks" sound when you squish your curls in your hands. This means you have enough water to disperse product and help your curl clumps form.
3. Roping
While in a bent position with your hair wet and the styler already emulsified in your hands, take a section of hair and gently squeeze it from the roots down to the ends in a smooth motion (it sounds weird, but imagine it like you were milking a cow). The roping technique enhances the curl pattern by creating uniform curl clumps and better definition.
4. Glazing/Praying Hands
Glazing is the easiest styling technique! To do this, take the styling products you need to bring out the best in your hair, pour them them into your hands, rub your hands together, and lightly run them through your hair from roots to ends, "glazing" the products over your hair as you go.
The praying hands technique is literally as the name implies: you place your hands on either side of a section of hair (near the root) and gently bring your palms together, applying pressure to your opposite hand. Keep your hands together in this “praying” gesture, as you move them down the hair shaft to the ends.
This smooths the product along the hair, encourages clumping, and reduces frizz. This technique can elongate the curls for some, especially if the hands are clamped together tightly. If you have curls that are easily straightened out, be mindful of how much pressure you apply. You can also do a little bit of scrunching afterwards as a finishing touch.
5. Accordion
A fancy name for a fancy trick! To carry out this styling technique, ensure you've worked your styling product into your curls, and then cup the bottom of a curl in your palms and rotate in a spiral-like manner following the natural pattern of the curl until your hand reaches your scalp. Hold for a few seconds and let go!
Accordion is perfect for giving that corkscrewed and well-defined curl. If you are looking for a technique to really enhance your curl pattern, this may be it!
6. Rake/Shingle
This technique is my absolute favourite because it gives the best definition ever! Although it can be more time-consuming compared to other techniques, that’s precisely why it works so well.
To rake and shingle, rake your styling products through your hair using your hands. Then, take a section of hair and ensure it's properly detangled and evenly coated. Separate a curl by smoothing it from root to tip and letting it drop. Repeat this process until you’ve achieved well-defined, individual curl pieces. This method is an excellent way to showcase your natural texture in the most defined way possible.
7. Rake/Shake

This is Ouidad’s signature way of styling! The first step is applying your leave-in conditioner, which - since we're following Ouidad's instructions - could be the Ouidad Moisture Lock Leave-In Conditioner. You can follow with the Curl Quencher Hydrafusion Intense Curl Cream or Ouidad Botanical Boost Multi-Use Curl Foam, applying it evenly to the hair.
Then divide your hair into 4 to 6 manageable sections. Use your fingers to rake in the Ouidad Coil Infusion Good Shape Defining Gel or Ouidad VitalCurl + Soft Defining Mousse into each section, detangling and smoothing in the process. As your fingers reach the ends, shake at the wrist to encourage curl formation. There are some excellent videos on YouTube for this technique.
8. Finger Coiling/Rolling
Finger coiling or rolling helps with defining each curl individually but is undoubtedly the most time-consuming way to style your hair.
For the finger coiling technique, after applying your styler, take a small section of hair. The tighter your curls, the smaller the section you'll take, while looser curls can take larger chunks. Smooth out the curl you're holding, then twirl it around your finger, keeping the hair pulled out long. Once it's twisted, continue twirling until the hair wraps itself around your finger, moving closer to your scalp. Drop the curl and repeat with a new section.
Finger rolling, on the other hand, gives really good results on looser curls. With a smoothed, curl-size piece of hair, start at the end and roll your index fingers around one another along with your hair, working your way up toward your scalp. Remove one finger and gently twirl the remaining one to release the curl.
Both techniques will leave you with well-defined curls, though it can be a bit tricky at first. However, once you get the hang of it, you'll be able to get it done with your eyes closed!
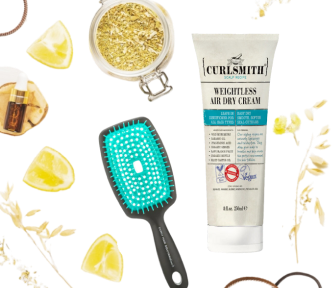
9. Brush Styling
There are so many variations to brush styling. You could brush upside down, brush from above, by taking smaller or larger sections, applying a little tension to the back of the brush, and so on. These little changes will give you different results, so experiment with them!
This technique is especially useful if you want more uniform, ultra-defined curls. In the store we often recommend brush styling to people who may not have consistent curls all around their head, which can happen for many reasons.
With brush styling, always start with freshly washed hair that has had at least a leave-in conditioner or curl cream applied. Then, using a Denman Brush, Bounce Curl EdgeLift Brush, Detangling Brush, Flexy Brush, or even a wide-tooth comb, you can transform your curls into smooth, curly ribbons with some skilful wrist work.
We recommend finding a video on YouTube or Instagram and following along with your own brush. Brush styling well can take practice but is usually faster than finger coiling or rolling and gives similar results.
10. Bowl Method
The bowl method had its “viral” moment on social media because it's a surprisingly effective technique for styling. If you give this a try, the 3 to 4 minutes it takes will be well worth it - and you may never want to go back to your old routine.
To try this out, begin with freshly washed, still-soaking hair. Bend forward, flip your hair over so it’s hanging in front of your face, and apply your leave-in conditioner or curl cream.
Use a wide-tooth comb or brush to detangle your hair from roots to ends. Then, dunk your hair into a bowl filled with water, lift it out, and scrunch it, making sure the water drips into the bowl. Your hair will be squishy and squelchy. Repeat the dunking and scrunching process about four times. After that, you can apply mousse or gel, squish out the excess water or plop, and dry as usual.